

PLEASE SELECT THE DESTINATION COUNTRY AND LANGUAGE :
| Self-production |
| 한국 |
| $71.75 |
| $410.00 |
| P00000PR |
  |

| Select item with details above |
| Name | Quantity | Price |
|---|---|---|
| My Goldberg / Convergence Talent Education / Group Class 1 set / Science Parish / Science Textbook |


|
71.75 ( 410.00) 410.00)
|
Discounted amount of your subtotal will appear when you place your orders.
Let's escape the Goldberg Canyon!
"My Goldberg"
Material
plastic, rubber, paper, wood, polyurethane, etc.
Components
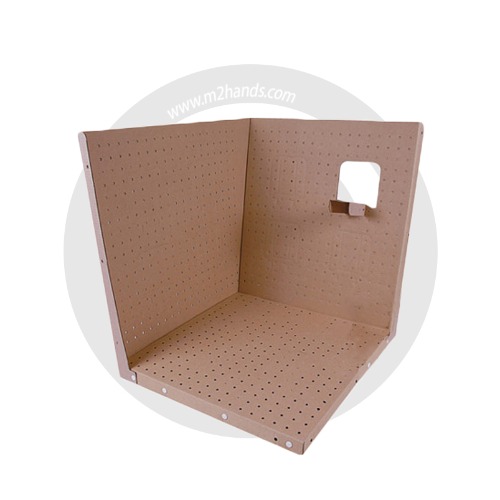
Gold Bug Box 1set (1 base + 2 side + base support)
Paper rails for stairs, Zigzag slide board
part :Foam rail, Foam rail pin, Foam hammer, Domino, Transparent rod, White rod, Wooden tongs,
Plastic cups, Paper cup, Balloon, Marble, Snap button, String pin, String, Spoon, Rubber band, Link
Size
Box assembly size: About W530 x L600 x H600 (mm)
*The color of the accessory may be changed at any time.
*Accessory kits can be purchased separately.
*Only Goldberg boxes can be purchased separately.
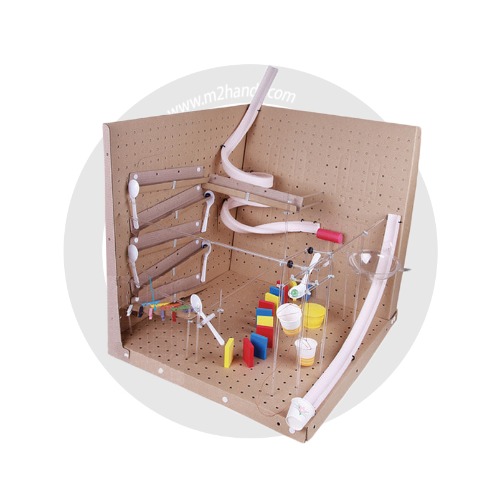
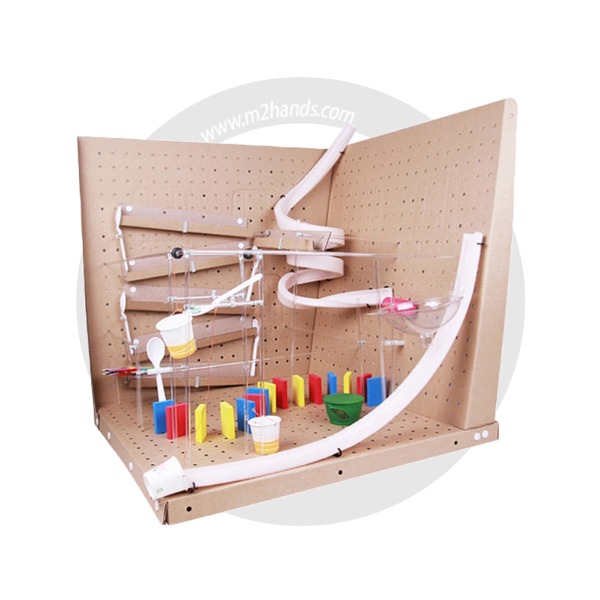
Goldberg devices are the most complex machines built to solve the simplest challenges.
There are interesting physics behind the various materials used in Goldberg devices.
1 step. Design and development
① Device configuration: 360º Vertical Roller Coaster-> Incline Rail-> Black Hole->
Zig Zag Slide-> Domino-> 180º Horizontal Roller Coaster-> Basket
② Goldberg device design considerations.
● After selecting the appropriate parts to compose the device, understand the role of each part.
● Consider the space to determine the order of placement and operation of the parts.
Basics. Let's make a Goldberg box
Goldberg Assemble the boxes you need for all levels of beginner, intermediate and advanced.
① Fold the square base board along the line and secure it with the snap button in the overlapping hole.
② Fold the two bottom supports facing each other as shown in the photo and secure them with snap buttons.
③ Fold the side 1 along the line, fit it into the groove of the base, and fix the snap button in the two holes.
④ Fold the side 2 along the lines.
⑤ Set the direction you want, and fix it with a snap button for each hole that meets side 1.
⑥ Box assembly complete.
1 step. 360º vertical roller coaster
① Insert the foam rail pin into the foam rail and fix it with a pin on the upper part of the side 1.
② Decide the radius of rotation of the ball and fix the point where the base meets the foam rail with foam rail pins.
③ Secure the last section to the bottom with foam rail pins.
* If the ball does not rotate, adjust the radius of rotation.
2 step. Sloped Rail (Downward direction)
① Fold the rail along the line.
② Insert the middle part of the floor with the fixing pin.
③ Align the holes with each other in the desired position and secure them to both ends of the rail with snap buttons.
④ Anticipate the movement of the ball and adjust the rails.
⑤ The third rail is also fix by adjusting its position.
⑥ Sloped rail complete.
* Roll the ball and adjust the angle of the rail.
3 step. 360º Vertical Roller Coaster and Sloped Rail Connections
① Drill a hole in the paper cup and tie the strings.
② Place the paper cup well so that the marble on the foam rail go into the paper cup.
Pass the string through the string pin and fix it in place on the bottom.
③ Tie the other side of the string to the domino and place it on the rail starting point.
4 step. black hole
① Position the funnel in the last section of the inclined rail and secure it to the base by inserting a transparent rod into the funnel wing hole.
② Raise the funnel wings and secure them to the side using a transparent rod.
*Cut off the remaining parts with scissors.
③ Black hole complete.
5 step. Zigzag slide
① Fold the slope board along the line, insert the transparent rod into the hole and fix it in the base.
② Make zigzag shapes with wooden tongs.
③ Zigzag slide completed.
*Roll the marble to adjust the angle of the tongs.
6 step. Domino and 180º horizontal roller coasters
① Arrange the dominoes so that the marble from the zig zag slide hit the dominoes.
② Fold the wing of the side along the line and fit the foam rail using foam rail pins.
③ Pass the foam rail through the hole in the other wing and fix it with foam rail pins.
7 step. Domino and 180º horizontal roller coaster connections & Roll the marbles
① Cut the foam rail into pieces, tie them string and place them at the start of the 180 horizontal roller coaster.
Then place the marbles in front of the pieces.
*Secure it in the middle with a string pin and tie the rest of the string to the last piece of dominoes below.
② 180º Adjust the position of the plastic cups so that the rotated marbles enter the basket.
③ Goldberg device completed.
Let's take a look at the main devices used in Goldberg devices (beginner)!
360º Vertical Roller Coaster-> Incline Rail-> Black Hole-> Zig Zag Slide->
Domino-> 180º Horizontal Roller Coaster-> Basket(Plastic cups)
1 step. Design and development
① Device configuration: 360º Vertical Roller Coaster-> Hammer switch-> Domino-> Zigzag slide->
Sloped rail-> Marble tumbling-> Black hole-> Rail switch-> Elevator
② Goldberg device design considerations.
● After selecting the appropriate parts to compose the device, understand the role of each part.
● Consider the space to determine the order of placement and operation of the parts.
Basics. Make a Goldberg box
2 step. 360º Vertical Roller Coaster
① After setting the starting point for the marbles, fix the foam rail to the side with foam rail pins.
② Pin the foam rail at the point where it meets the side.
*Make as many rollercoasters as you want.
③ Secure the end of the foam rail to the midpoint of the side.
3 step. Hammer switch
① Press the center of the foam hammer that will be the head of the hammer with a transparent rod.
② Put a rubber band on the white rod and place the transparent rod in the center.
Pull the rubber band to wrap the transparent rod and fix it on the opposite side.
③ Wrap the band around the white rod to fix the transparent rod, and then insert another transparent rod into the white rod.
④ Connect the transparent rod of the hammer with the rod link and insert it into the hole on the side.
⑤ Adjust the height of the hammer so that the marbles from the rail can hit the hammer.
⑥ Position the domino so that the hammer hits the domino and arrange the dominoes so that they can be connected to the next device.
4 step. Zig Zag Slide
① Place wooden tongs zigzag on the slope board.
*Adjust the position to allow the marble to pass.
② Secure the transparent rod using the link where the zigzag slide is to be located.
③ Fix the zigzag slide with a transparent rod on the side as shown in the picture.
④ Secure the white rod and spoon with a rubber band in the same way as the hammer switch.
Insert a transparent rod on the white rod and use the link to create a support.
⑤ Secure the spoon switch to the bottom hole.
⑥ List the dominoes as shown in the picture so that you can hit the marbles with a spoon on the zigzag slide.
*Use the elasticity of the rubber band
5 step. Sloped Rail (Upward Direction)
① Position the rails so that the marbles from the zigzag slides naturally go to the sloped rails.
② Secure the rails with snap buttons at different angles as shown.
③ Place a clear rod on the spoon and secure it with a rubber band.
*Insert links on both sides of the transparent rod.
④ Insert the spoon with the transparent rod in the middle of the rail into the hole to fix it.
⑤ Connect spoons by section and place beads slightly between spoon head and rail.
6 step. Marble tumbling
① Connect the transparent rod to the side and insert it into the rail using the link.
② The other side of the rail is also fixed with a transparent rod and a link is used to create a transparent rod support.
③ Cut the balloon about one third. Open the cut balloon and wrap it around the plastic cup.
*Pull it as far as it will go to make the opening smooth.
④ Adjust the position so that the marbles dropped from the rails fall on the marble tumbling.
7 step. Black hole
① Secure the funnel with a transparent rod using holes in the bottom and walls.
* Adjust the height so that the marble bounced by the marble tumbling can enter the funnel.
8 step. Rail switch
① Secure the foam rail to the midpoint of the wall, and connect the transparent rod connected to the funnel with the foam rail.
*Push the transparent rod to the wall to fix it.
② Secure the end of the foam rail to the floor and adjust the position so that the marbles from the funnel rest on the foam rail.
9 step. Elevator
① Consider the height of the elevator you want to raise and make a column with a transparent rod.
② Insert the transparent rod into the pulley and fix it to the wall.
③ Connect the pulley in the same way on the other side.
④ Connect the two pillar to which the pulley is connected using a transparent rod and a link.
*Insert a long transparent rod into the wall to fix it firmly.
⑤ Tie the paper cups together and hang them on the pulley.
⑥ Connect one more transparent rod to each side of the pillar.
⑦ Tie a string to a spoon. Place a clear rod on the spoon and secure it with a
rubber band. Insert the links on both sides of the transparent rod.
⑧ Connect the other side of the spoon strap to the paper cup.
⑨ Connect the spoon to the transparent rod attached to the pillar.
⑩ Attach the paper cup to the other side of the spoon with a string and place the paper cup at the end of the foam rail.
*Marbles from the funnel come down to the foam rail and enter the paper cup.
⑪ Put the marbles on the spoon. Beads from the funnel pull the spoon through the paper cup and fall into the paper cup elevator.
⑫ Goldberg device completed.
10 step. Let's take a look at the main devices used in the intermediate Goldberg devices!
360º Vertical Roller Coaster-> Hammer switch-> Domino-> Zigzag slide-> Sloped rail(Upward direction)
-> Marble tumbling-> Black hole-> Rail switch-> Elevator
There are no posts to show
There are no posts to show
PLEASE SELECT THE DESTINATION COUNTRY AND LANGUAGE :