PLEASE SELECT THE DESTINATION COUNTRY AND LANGUAGE :
| Self-production |
| 한국 |
| $26.25 |
| $150.00 |
| P00000PM |
  |

| Select item with details above |
| Name | Quantity | Price |
|---|---|---|
| Play Gear / Set of 5 / Science Books / Science Kit / After School Books |


|
26.25 ( 150.00) 150.00)
|
Discounted amount of your subtotal will appear when you place your orders.
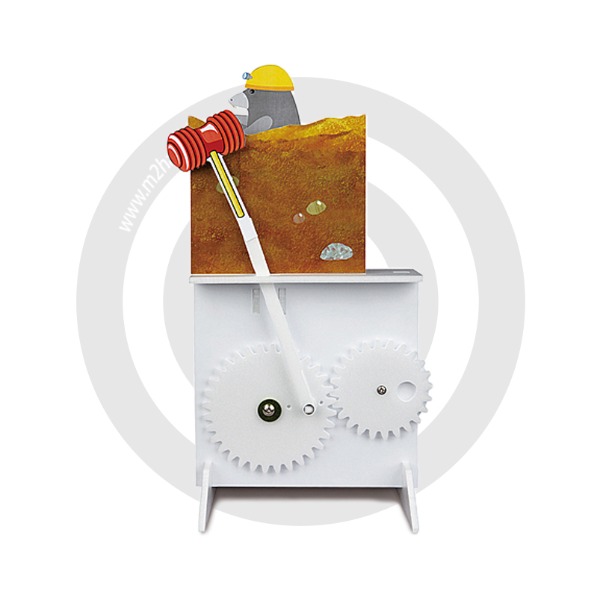
The gear rotates and the picture moves
"Play gear"
Material
Board, Paper, Rubber, Steel
Components
Main body, Top, T-shaped crank, I-shaped crank, Main body support, support, Top support, Cam, Gear,
Board washer, Washer, Pictures, Screw, Rubber ring, Square rubber, Hex nut
Understand the concept of automata and see how power in physics is related.
1 step. Given problems
2 step. Create a play gear
① Put the washer and square rubber on the screw A in turn.
② Insert screw A into the hole in the center of gear A.
③ Insert screw B into the small hole in the top of gear A.
④ Fit board washer on screw B.
⑤ Fix the I-shaped crank and the rubber ring in order on the board washer.
⑥ Insert the screw in the center of gear A into the larger of the two holes in the center of the main unit.
*Check the location of the holes.
⑦ Turn the body over and insert the washer and the square rubber ring in turn into the screw A coming out of the hole.
⑧ Align the hole of the cam with the square rubber and insert it.
⑨ Insert screw B in the center of gear B, turn the gear over and put a washer on the screw.
⑩ Insert gear B into the remaining hole in the main unit, and make sure gears A and B are engaged.
⑪ Secure the screw B behind the gear B with a rubber ring, and insert the two top support into the grooves on the top of the main body.
⑫ Put the crank connected to gear A upright, and cover it with the top.
⑬ Insert support A and B into support C to make the crank support.
⑭ Place the T-shaped crank upside down and insert it into the top groove.
⑮ Cover the T-shaped crank with the crank support made in step 13 and fit it into the groove in the body.
⑯ Insert the hexagon nut into the hole in the center of the head of the T-crank and fix it firmly.
3 step. Decorate play gear
① Fold the glued part of the ground picture, stand between the two cranks on the play gear, and attach it.
② Attach the hammer picture to the end of the I-shaped crank about 1cm.
③ In the same way, attach a mole photo to the end of the T-crank.
④ Hold the left side of the top as shown in the picture, and rotate the gear B to observe the movement of the mole and the hammer.
*Make your play gear fun by drawing on a blank sheet of paper in the kit.
The holes in Gear A can be used to change the height of the crank, or use the round cam included in the kit to vary the movement.
4 step. Activity using the kit
There are no posts to show
There are no posts to show
PLEASE SELECT THE DESTINATION COUNTRY AND LANGUAGE :